Joystick protocol
Objective
Investigation of behavioral responses (approach or avoidance) of Drosophila under optogenetic activation of specific dopaminergic neurons in an operant conditioning experiment.
Day | 1 | 2 | 3 | 4 |
Tasks | Collecting flies | Preparing experiment vials / Sorting flies | Flipping vials | Fly preparation / Test preparation |
Day 1: Collecting Flies
• Collect one-day-old flies from the breeding vial.
• Incubate the flies overnight in a large vial at 25°C.
Day 2: Preparing Experiment Vials and Sorting Flies
Preparing the vials:
- Use small, air-bubble-free vials without yeast.
- Apply 15 µl all-trans-retinal (ATR) or 15 µl ethanol (control solution) evenly onto the surface of the vial. Wear gloves while handling.
- Note: ATR acts as a chromophore required for light-dependent activation of channelrhodopsin.
- Distribute the liquid evenly by tilting the vial to ensure full coverage.
- Wrap the vials in aluminum foil to prevent light exposure.

Sorting the flies:
- Anesthetize the flies from the previous day on a cooling station.
- Select approximately 30 male flies using a fine brush to avoid injury. Depending on the genetic cross, ensure to remove balancer flies if necessary.
- Carefully transfer 30 males into the ATR and control vials using the brush.
- Initially store the vials horizontally to prevent flies from sticking to the food.
- After 10 minutes, turn the vials upside down and incubate them at 25°C.
- Cover the vials with an additional box to minimize light exposure and ensure the aluminum foil is sealed properly.
Day 3: Flipping the ATR Vials
1. Flip the covered experiment vials so the flies can access the food better.
2. Incubate the flies for another night at 25°C, allowing optimal ATR metabolism.
Day 4: Fly Preparation and Test Setup
Materials for Fixiation: Standard tweezers, Reverse tweezers, UV glue, Fly holder, Fishing line, Clippers (for cutting the fishing line), Spatula (or a fine dissecting needle) for glue application.
Fly preparation:
- Attach each fly individually to a 0.6 mm thick fishing line (approximately 2 cm long) using UV glue at the thorax.
- Ensure a right angle between the fly’s body and the line.
- Secure the light guide in a micromanipulator clamp.
- Apply a small drop of UV glue at the lower end of the light guide using a fine dissecting needle.
- Position the light guide on the thorax using the micromanipulator and hold it under UV light for about 15 seconds.
- Store the fixed flies in a dark box at 25°C for one hour.

Testing the Flies:
- After storing for one hour, feed the flies with sugar solution for 5–10 minutes in a dark chamber.
- Place them carefully onto moist filter paper sprinkled with sugar granules.
- Carefully remove the flies from the dark chamber.
- Trim the fishing line to approximately 5 mm using scissors or clippers.
- Test three flies simultaneously per trial session.
- Position the flies under the illumination system using the light guide holder.
- Adjust the joystick platform so that the flies hang in a neutral position, neither stretching their legs too much nor being pushed down.
- Place a cardboard cover above each joystick setup to ensure flies are only exposed to joystick light.

Starting the Test and Program Settings:
1. Start the Joystick Program and set the light color (Red or Yellow):
• Red light: Set voltage to 6V

• Yellow light: Set voltage to 3.8V

• Top-left knob = fine adjustment
• Top-right knob = coarse adjustment
2. Under “Adjust Zero Settings”, ensure that platforms without flies on them are zeroed properly.
• The red, blue, and green lines should ideally align exactly on the black zero line.

• Coarse alignment can be adjusted using the dial on the platform (turn carefully).

• Fine alignment is done using arrow keys in the program.

3. Adjust further settings according to the instructions:
• Te = Test rounds (without stimulus)
• M & M_S = Test rounds with light stimulus
• Alternate “Right” & “Left” between different flies
• Set Duration to 60 seconds per period

4. Once settings are correct:
• Click STOP → RESET → RUN
• The elapsed time is displayed under “Elapsed Time”
• The program stops automatically after ~12 minute
5. Save the Results
- Create a separate folder for Yellow and/or Red light before saving.
- Name the dataset properly, e.g.: 01.01.24_FlyLine_Yellow.dat
- Also add the text file in the respective folder.

• Use Tabs between columns in the text file.
• The first column must match the exact name of the (.dat) file.
• The second column specifies the fly line (for later R analysis).
• Everything after ”#” in the text file is ignored by R, so you can use it for comments.
6. Data Analysis in R
- To analyze the data in R:
• Red light = Open Red.R
• Yellow light = Open Yellow.R

2. Important file paths:
• Line 5: Path to the .dat files (use double slashes //)
• Line 6: Path to the .rmd file
• Line 7: Name of the HTML results file
• Line 8: Correct name of the text file
3. Analyze results based on the HTML file.
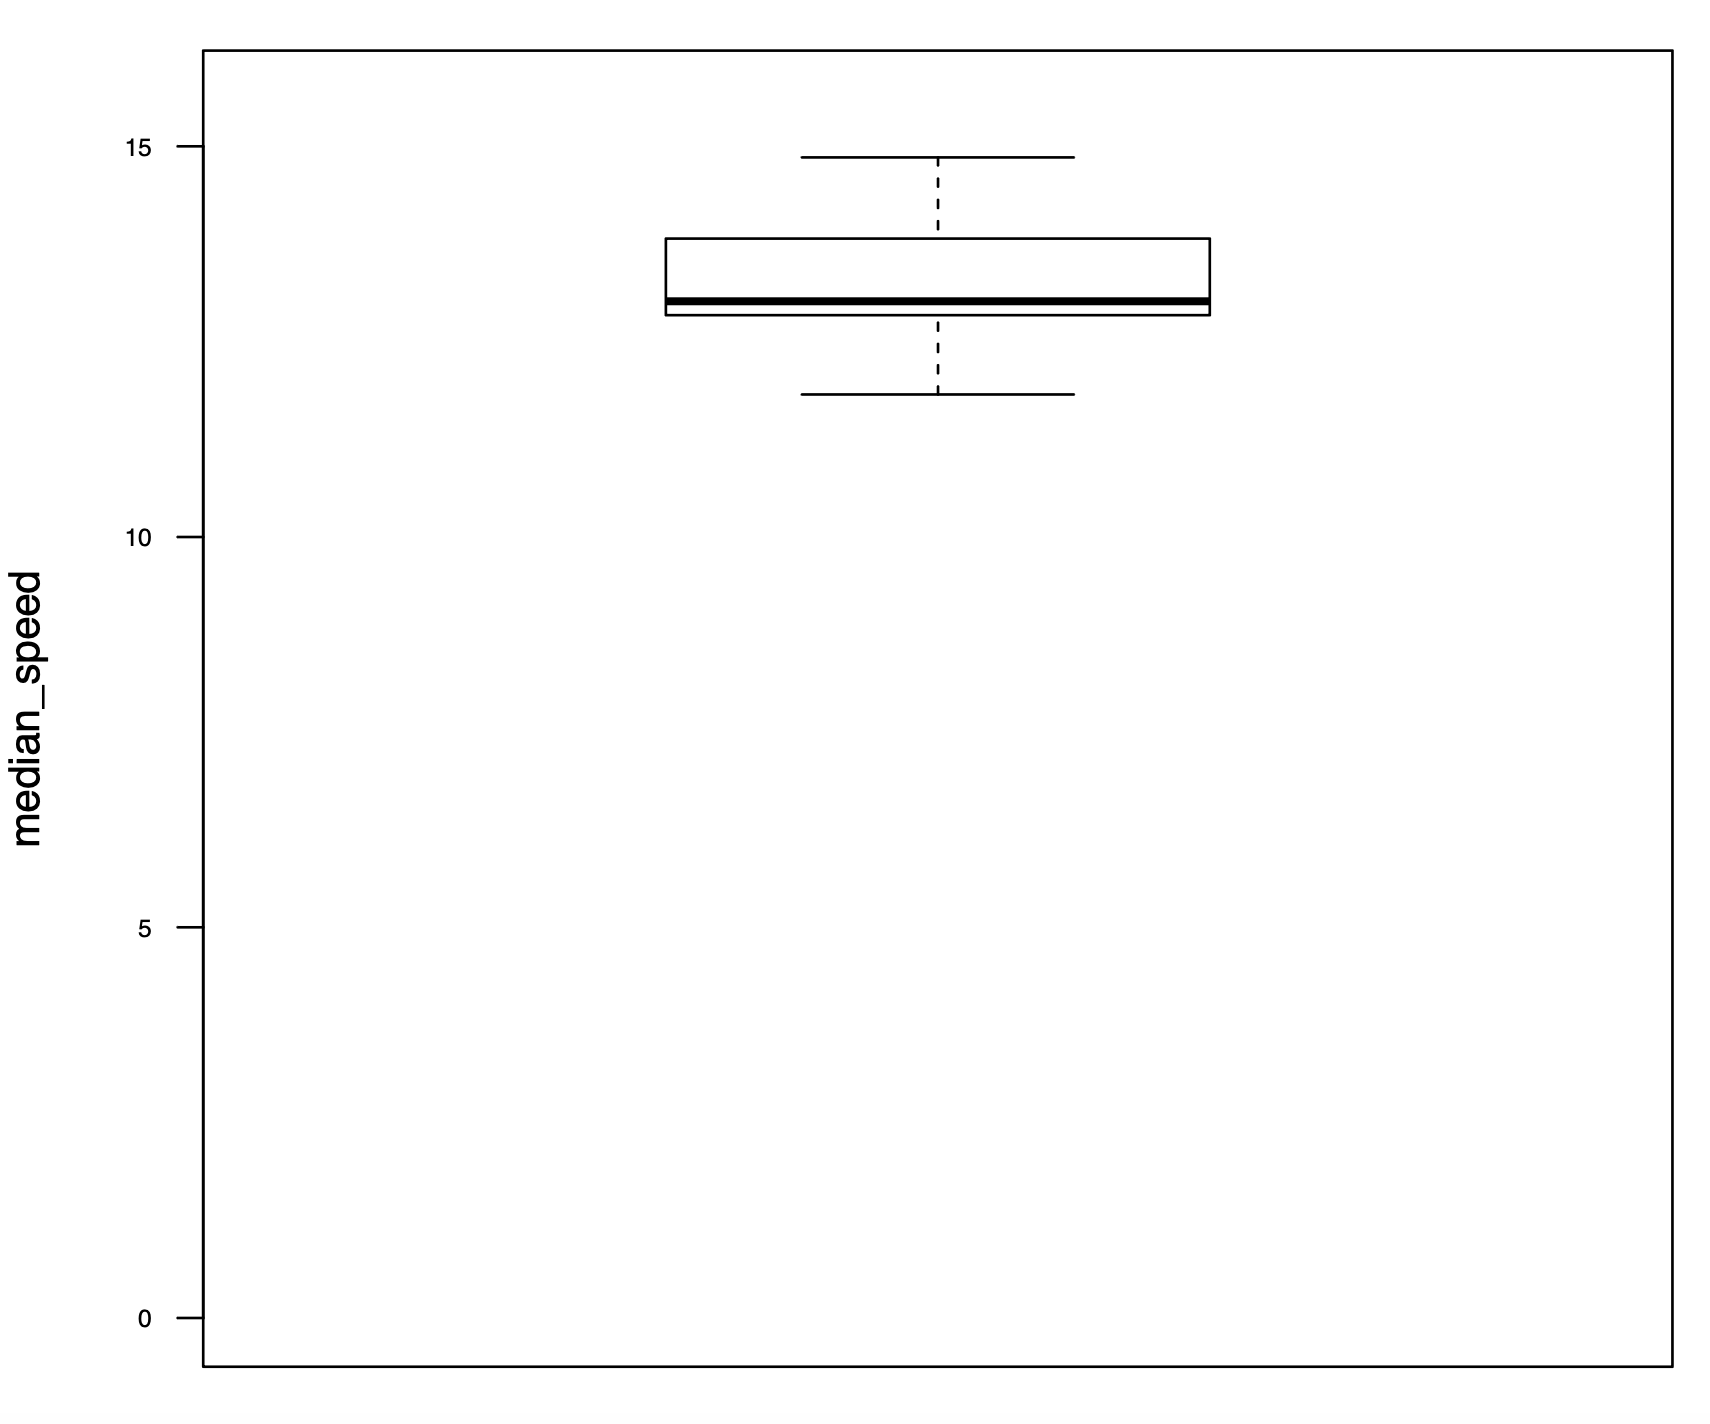
Buridan Test WTB; 3IY in 5%Sucrose
Final Results
3IY; N=16
Sucrose; N=16


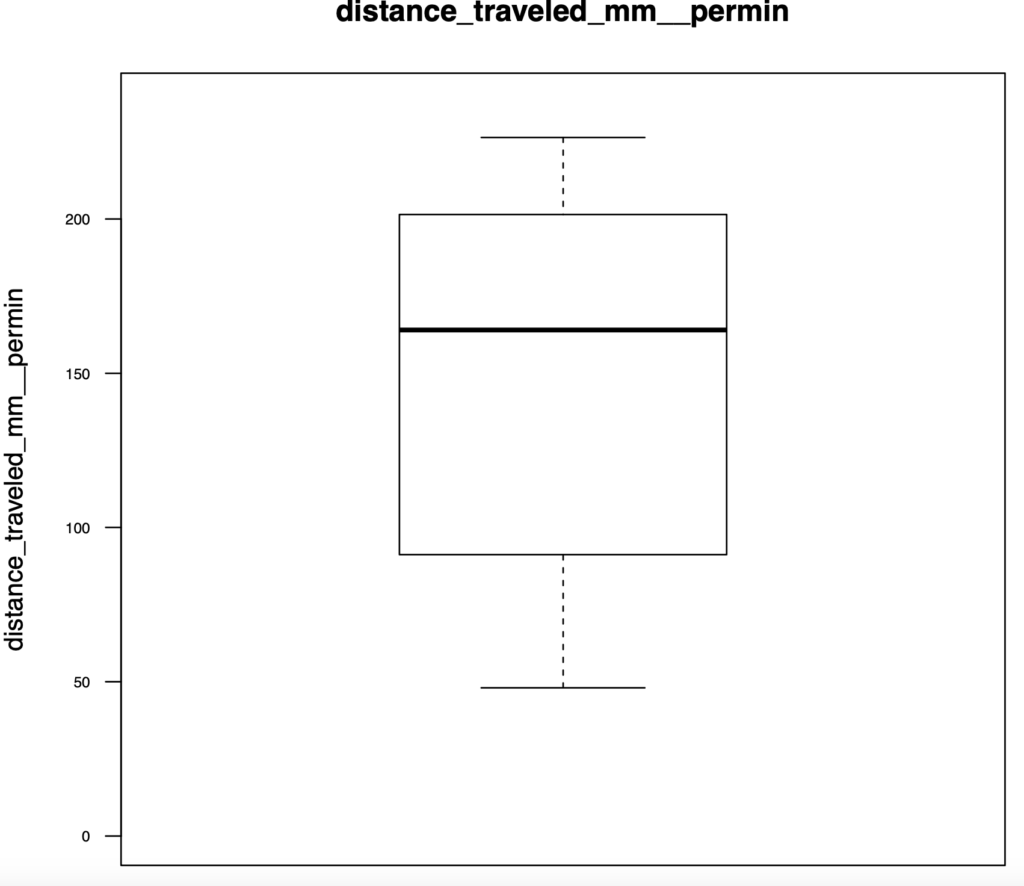
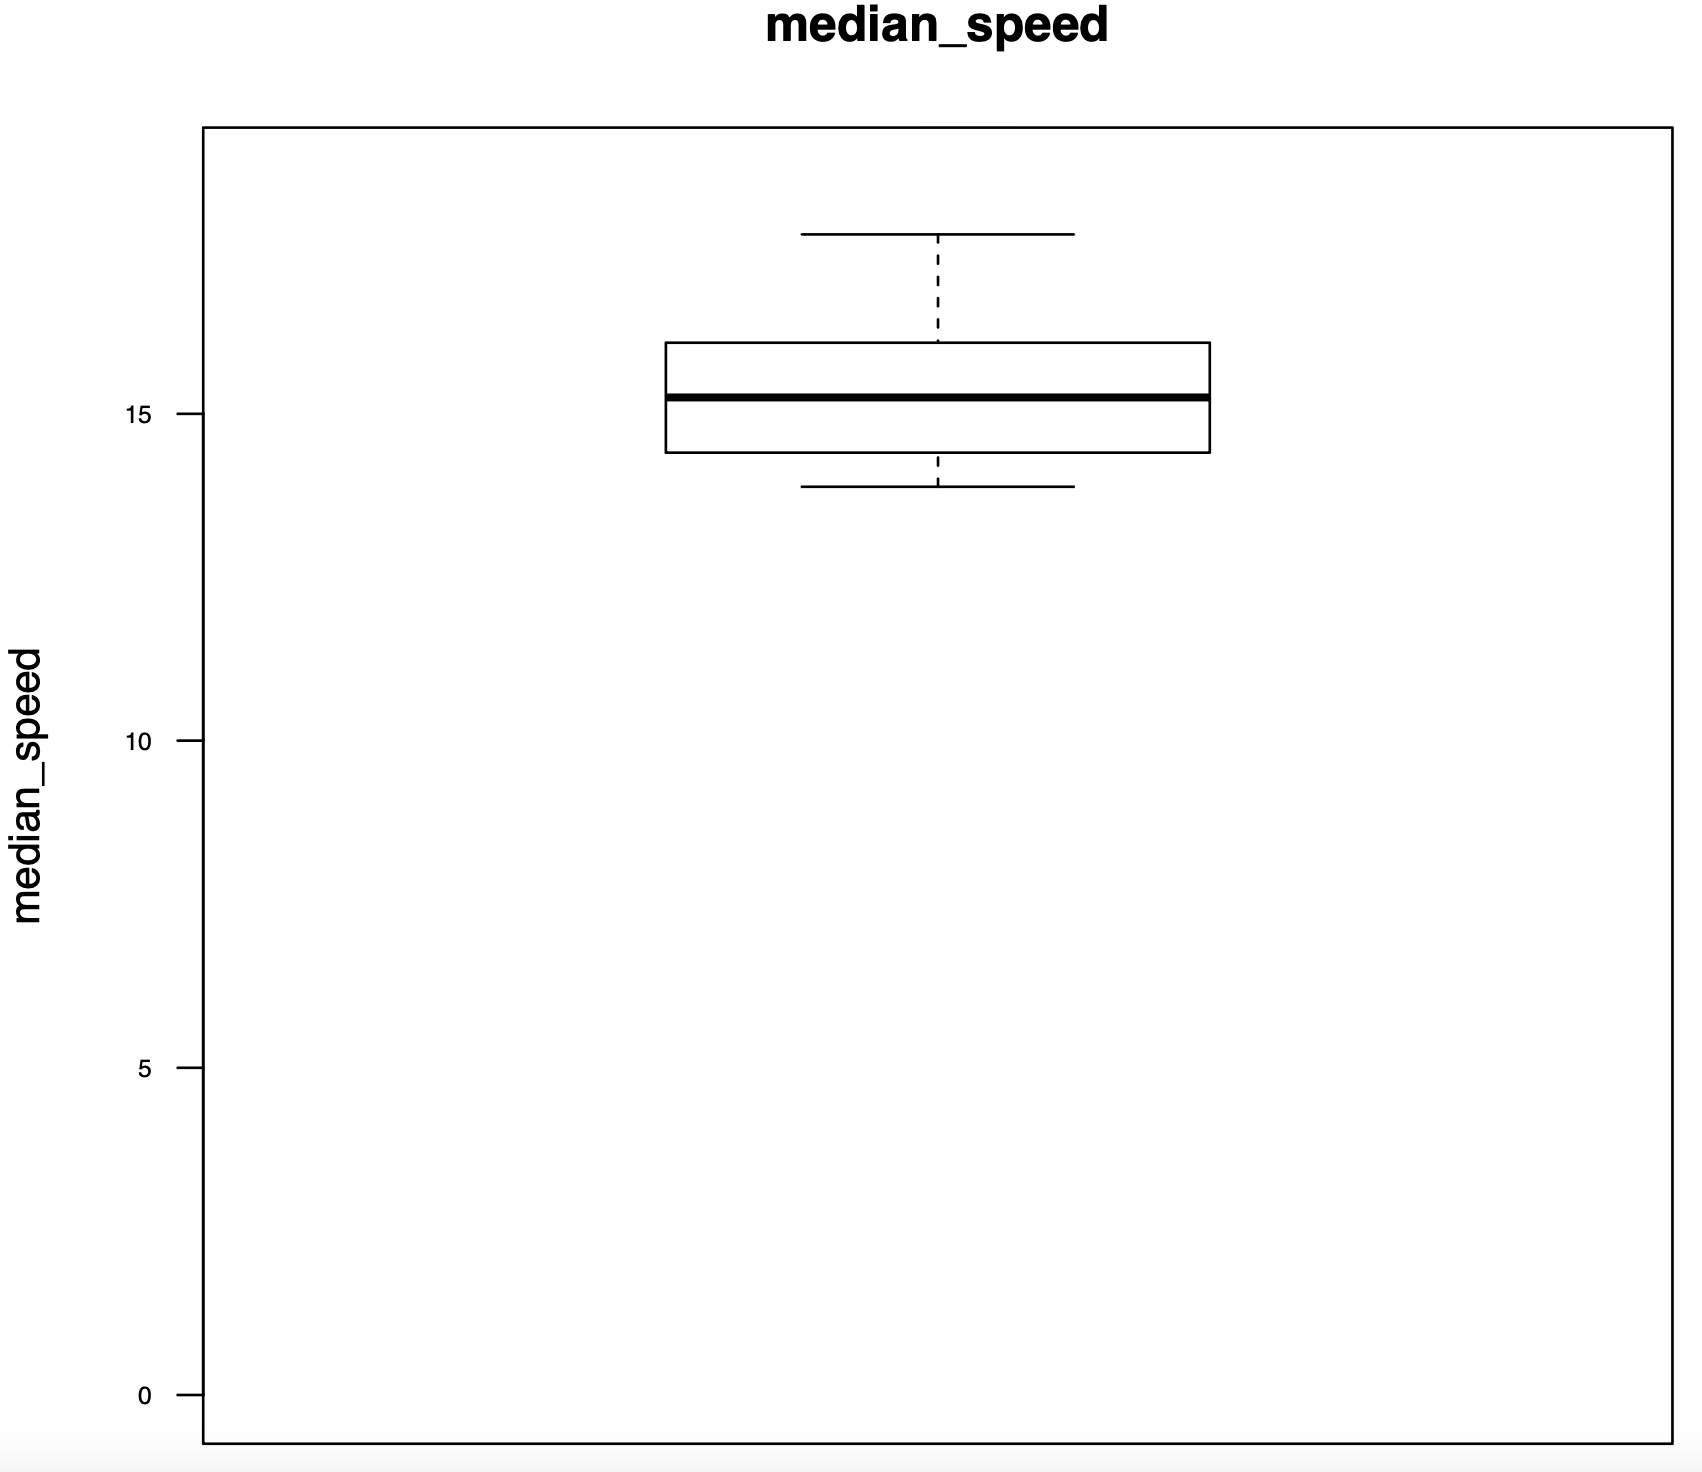
Buridan Test WTB; 5%Sucrose


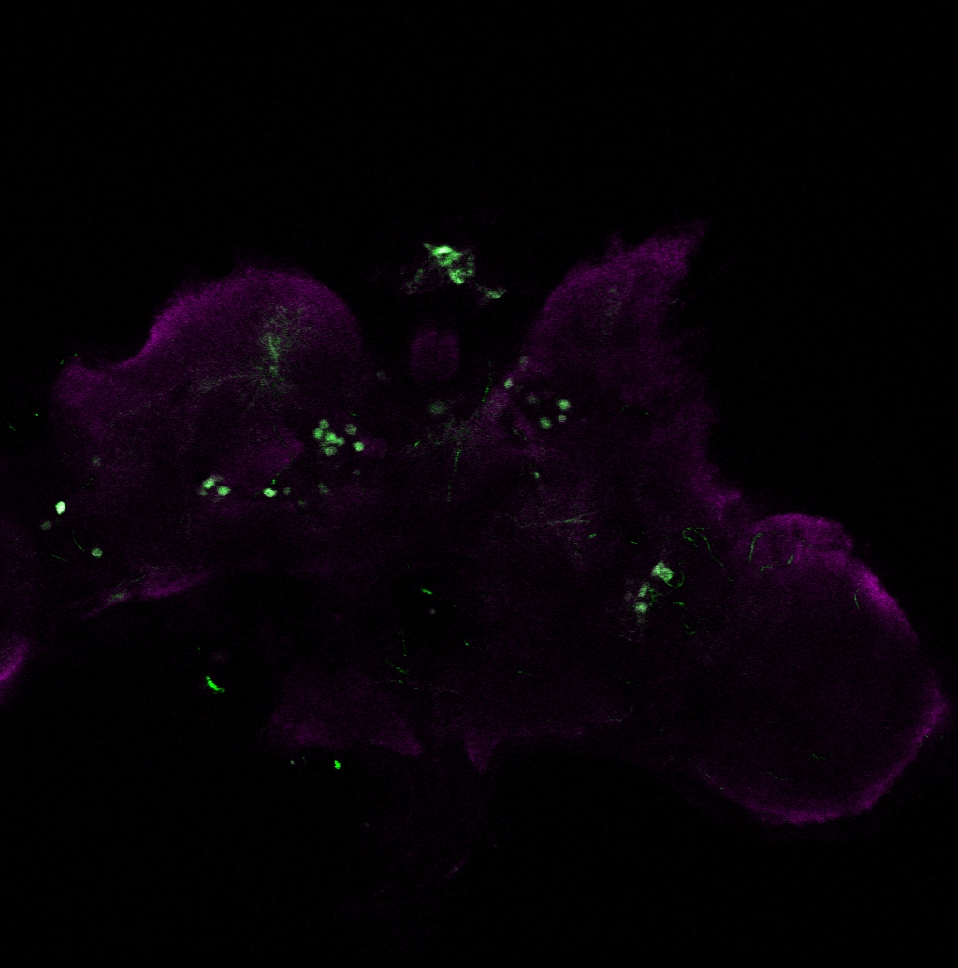
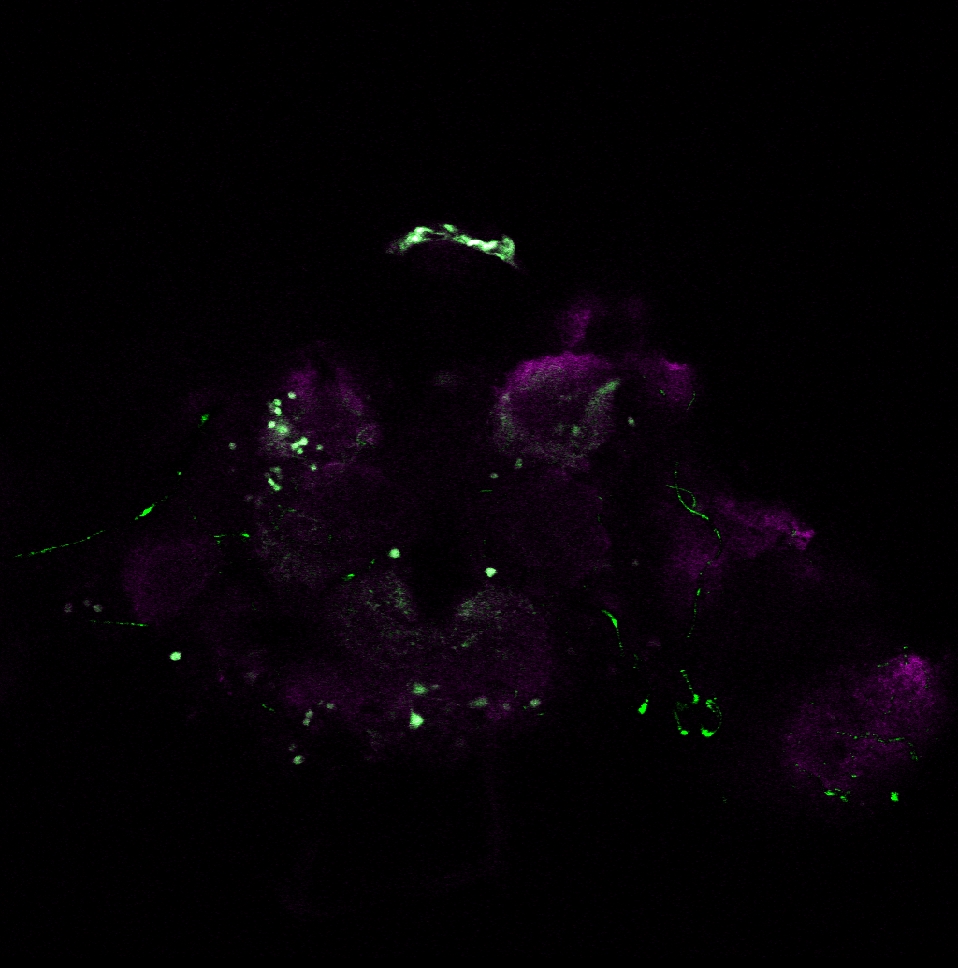
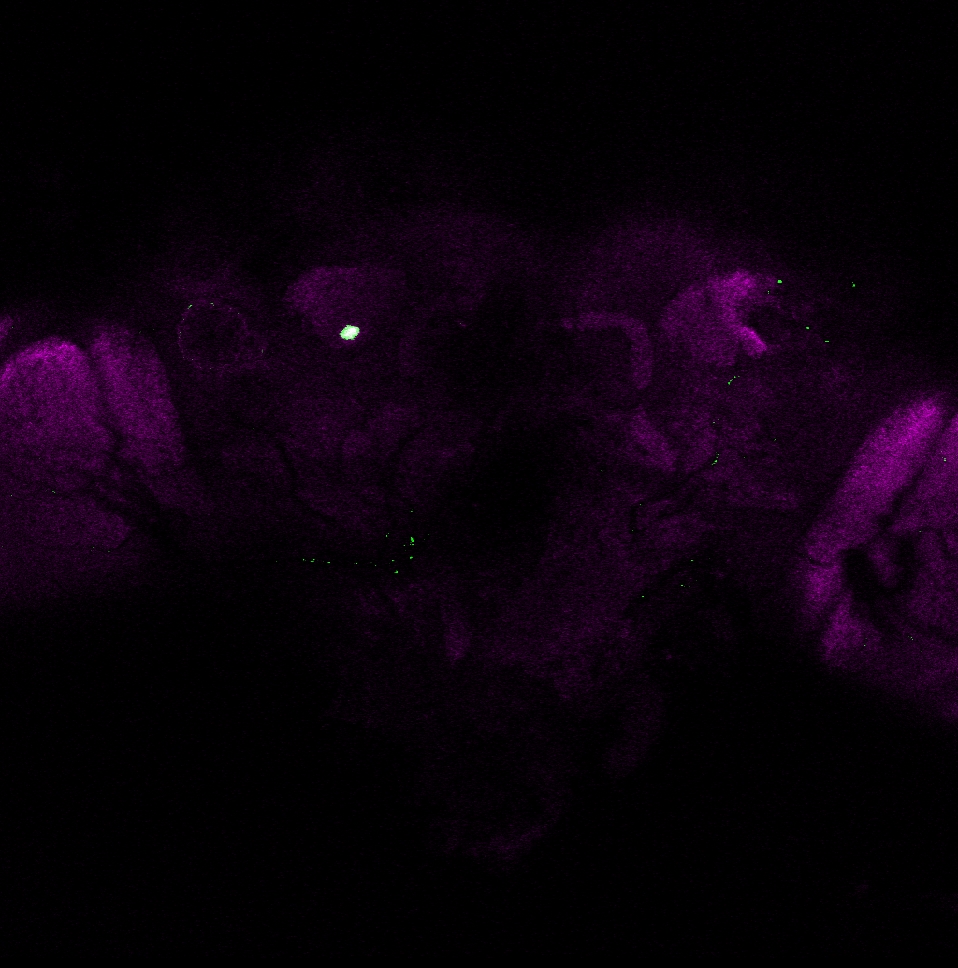
Dissection of adult Drosophila brains
FLP; GFP ♂1
FLP;GFP♂2
FLP;GFP♀1
W|TH-Gal4-UAS-GFP|♂1
W|TH-Gal4-UAS-GFP|♂2
W|TH-Gal4-UAS-GFP|♀
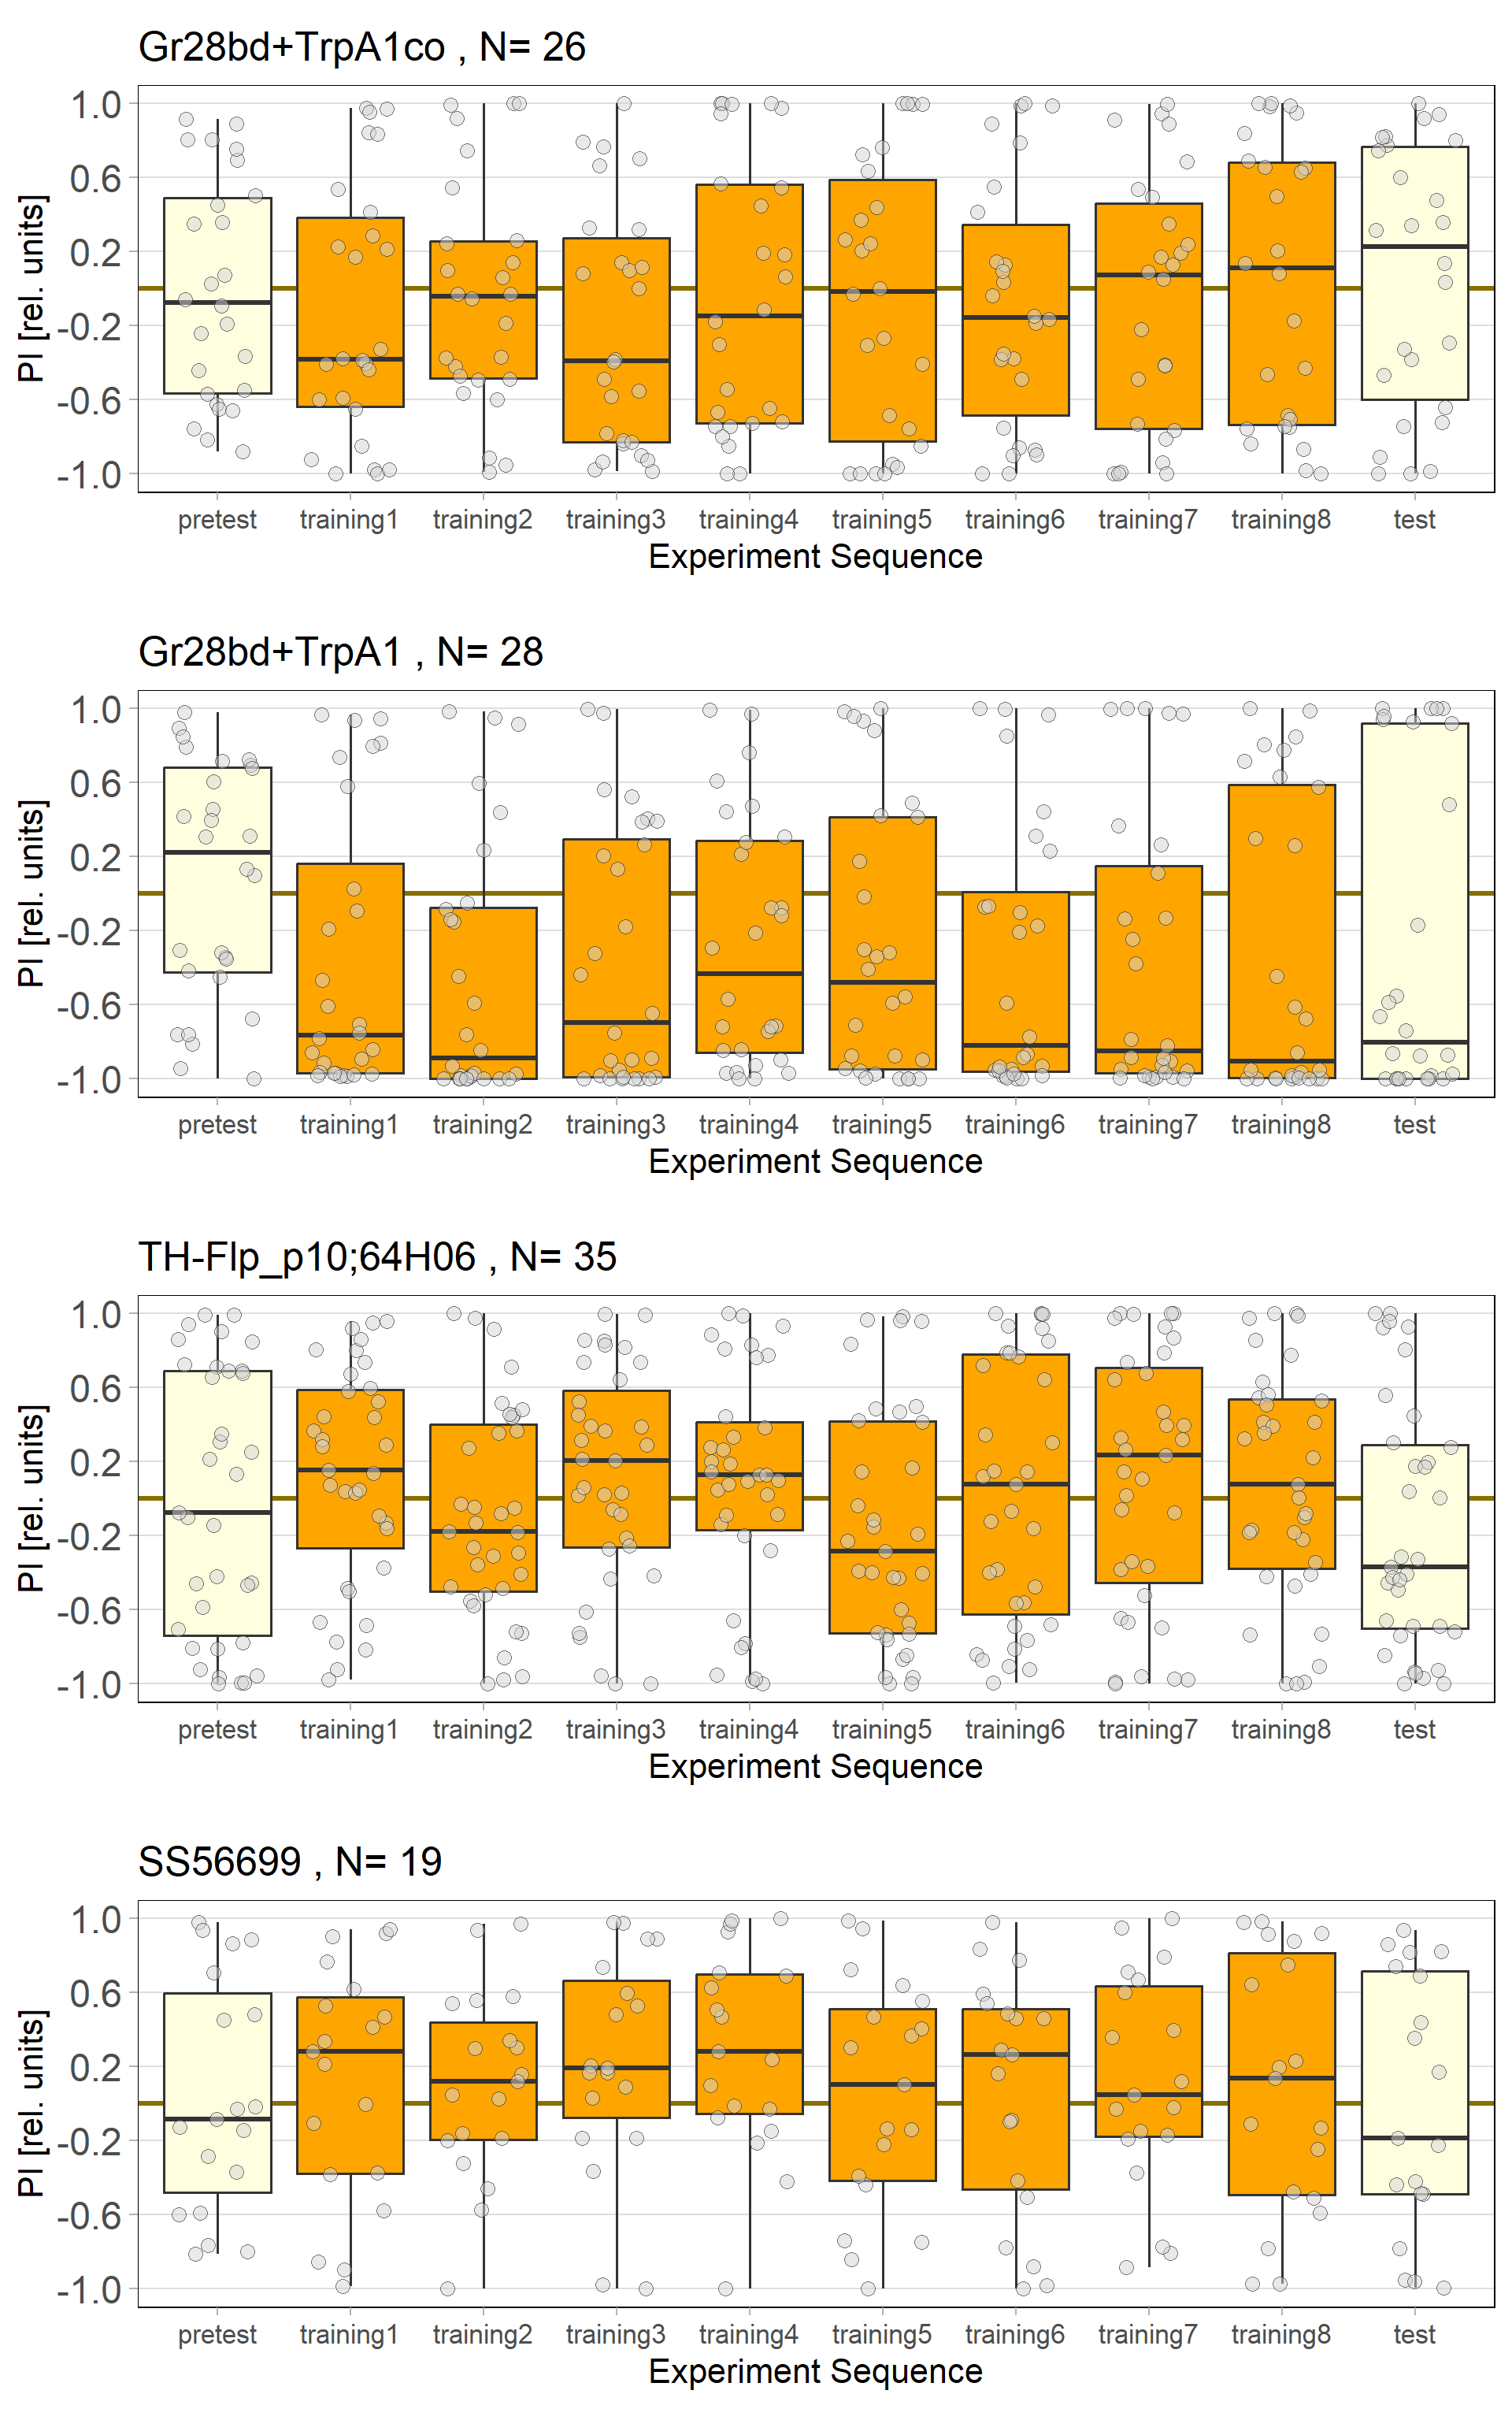
Joystick results Yellow light, testing with and Without food
The positive control was tested once without food and once with food to observe its effect on general behavior, particularly on learning behavior. NF = No Food / WF = With Food
